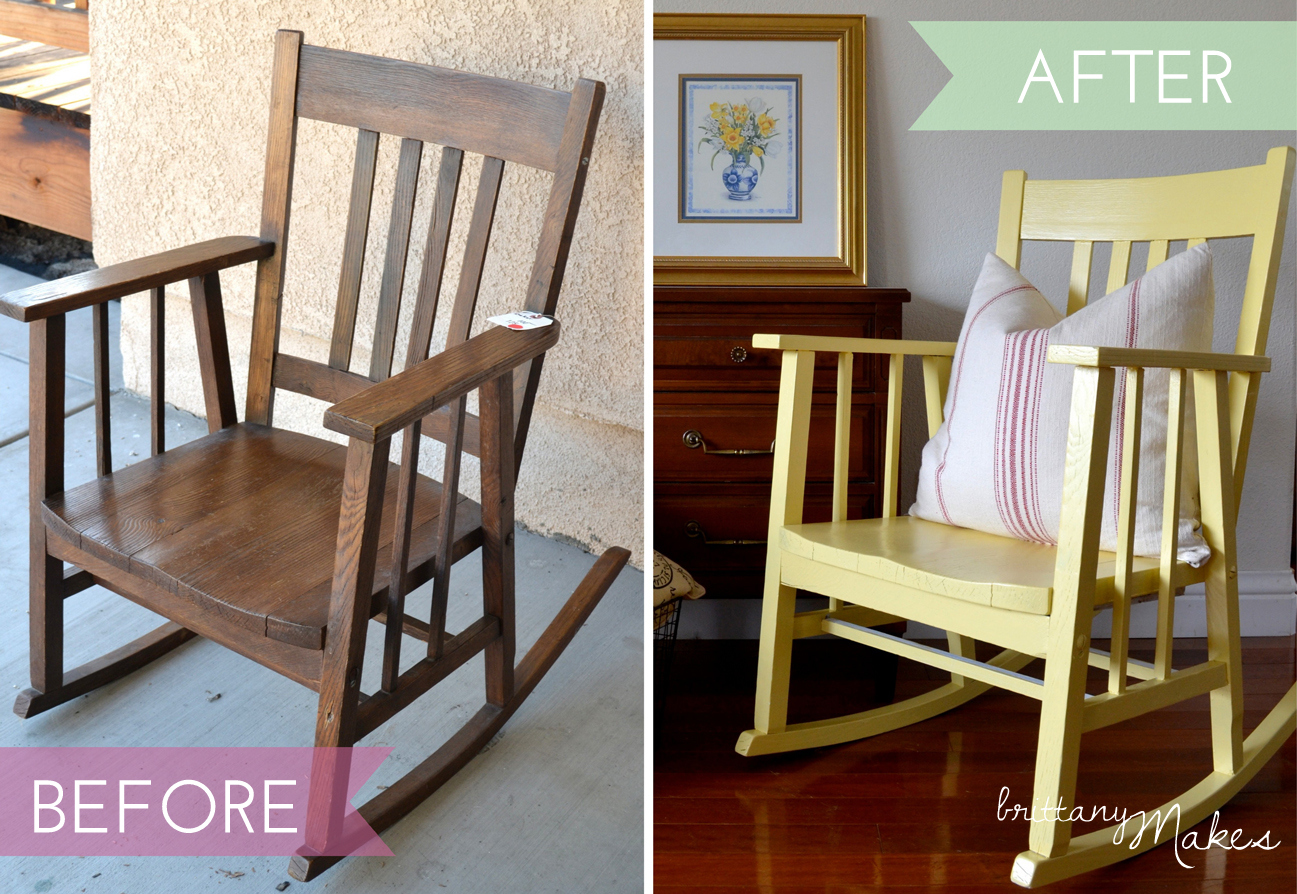
Let’s start with a nice little before & after shot…

My aunt and I went to Oakland’s annual White Elephant rummage sale last month, and we both scored some pretty fantastic items. This incredible event is held (only!) once a year. People from across the Bay Area donate everything from furniture, art, clothing, jewelry, dishes, house hold knick-knacks – you name it – and all proceeds from the rummage sale benefit the Oakland Museum of CA.
I fell in love with all the French-y cane and wing back chairs, which I’m still so bummed I couldn’t sneak home. Next year. Next year. My aunt, on the other hand, became immediately attached to this old rocker. She had been hunting for a rocking chair for quite some time, hoping to find one to compliment her bedside table. This guy fit the bill. Unfortunately, he needed a little work…
Apart from a couple major blemishes, the wood was in decent shape. It looks like someone broke through the back rails years ago, and tried to patch it up with homemade wood filler… Whatever it was, it didn’t hold up. I reassured my aunt, told her not to worry, it would be an easy fix – her super crafty niece has her back! I knew this would be the perfect project to share with my readers, on how to paint a wood chair.
Let’s take a look at how I revived this classy rocker…

1) Use a medium grit sanding sponge and sand until the wood is smooth and even. This will remove the old, musty crusty layer of film, dirt, grim, and the original top coat which is probably chipped or splotchy with age.
2) Wipe down the dust created from step one with a baby wipe or wet towel

Step 3) Apply wood glue to any areas that are separating or loose, if needed of course. I used a bungee cord to tighten and secure the chair while the glue dried.
Step 4) Apply wood filler as needed. I use Elmer’s wood filler, it’s easy to mould, inexpensive, dries fast, and is easy to sand flush with the wood once dry

Step 5) Prime it! I recommend using a high quality primer, like Zinsser. You can see the can in the background. I also recommend using a high quality angled brush, and Purdy is the way to go.
Step 6) Once the primer is dry, use a sanding sponge and sand the primer smooth and even. You should be able to tell if it’s smooth by rubbing your hand over the sanded area. Bumps or rough spots? Not smooth, keep sanding. Just don’t take off the entire layer of primer ;)
 Step 7) Paint it! I’m fail and forgot to take a picture of the paint can. I used a quart of Benjamin Moore’s Advanced Formula in Laguna yellow 291, in a satin finish.
Step 8) Seal it! I’m a big fan of Minwax’s wipe-on poly, just make sure to wear gloves. This poly is thinner than your average poly, which makes for an easy, streak-free application. It dries fast and doesn’t yellow with age. One or two coats is all you need to protect a piece like this rocker. A dining table, for example, now that will take 6-8 coats!
Can’t press ‘post’ without a close-up!
And one final look-y-loo before this chair makes its way to its new home. And I promise to follow up with finale pics, once this rocker is back in my aunt’s hands.

)
)


Gorgeous!! I’m really liking yellow at the moment, great color choice!
Awesome photography and directions too – well done!!
I love this! Good for you seeing the potential and taking the time to fix it. I love the yellow!
Elisa
home sweet nest
Looks like new! Love it!
Wow, I love it! You did such a beautiful job, I don’t think I would have given that rocker a second look but it looks so cute now :) Thanks as well for your super sweet comment on my blog, it cracked me up :)