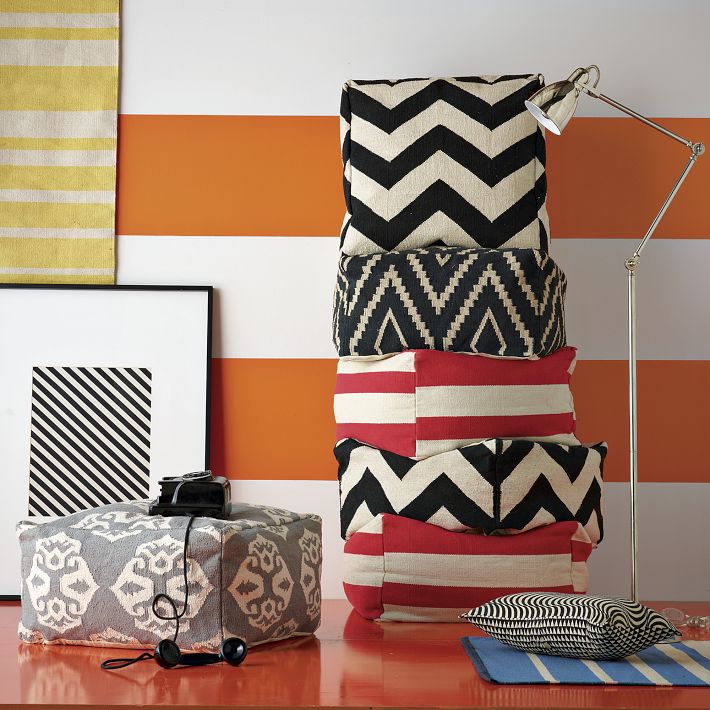
West Elm has tempted me on more than one occasion, first it was their papier mache wildebeest heads… now, it’s their floor poufs. Unfortunately, their prices are devastating – $249 for the patterned poufs or $219 for the striped pouf. Sorry, I just can’t justify spending that much on a floor pillow. Once I realized the price, I let myself feel about 45 seconds of sadness for not being able to afford such a luxurious floor pillow. Then, my DIY superpowers kicked in and I decided I could make it myself! How hard could it be? Fabric? Stuffing? Sewing in a straight line? Easy!
Let’s take a minute and longingly gaze at these West Elm beauties…
I’ll take all of them! A friend of mine also had the same idea, so we decided to work together and make a variety of poufs! Let’s take a peek!
#1) the West Elm Hack
#2) The tribal – a round pouf

#3) the gold crocodile – a round pouf

I think I’m addicted to floor pillows. I made four over the weekend, and two more are in the queue. My friend and I were totally inspired by tribal prints, so much so that we almost went out shopping for ponchos! Instead, we found some crazy tribal drapery fabric at Home Fabrics & Rugs. Now for the exciting part…
DIY Round Pouf Tutorial
Follow these 14 easy steps…..
Step 1) lay your fabric on a flat surface, wrong sides out
Step 2) pin your pattern on the fabric
Step 3) cut along the pattern
Step 4) repeat steps 1-3 three more times, for a total of four double sided forms
Step 5) sew the right side of each form (repeat for the remaining 3 forms), then remove the pins
Step 6) lay the first form on top of the second, wrong sides out, and pin along the right side
Step 7) take the third form and lay on top of the first form, wrong sides out,and pin along the right side. Repeat with the remaining form so all pieces are pinned together and form a round shell. Next, sew the pinned sides together, but be sure to stop 2 inches short of the edge to create an opening for you to fill with stuffing.
Step 8) the round shell will take shape once all pieces are sewn together, be certain you’ve removed all pins before proceeding

Step 9) turn the shell inside out
Step 10) gather your stuffing – I used a variety of leftover foam I had on hand which I cut in oval and circular shapes to fill the center of the pouf. I also used stuffing from old pillows, and bought a bag of polyfill from the local fabric store. Poly-fill is expensive, so I recommend using anything you have on hand to fill the pouf. You want the center to be dense, and the surrounding area to be soft and fluffy, which is why I stuffed it with leftover foam.
Step 11) First, stuff about 1/3 of the bottom with poly-fill or cotton
Step 12) Then, lay the foam in place. Last, fill and surround the foam with the rest of the cotton or poly-fill.

Step 13) Be careful not to over stuff. You want the pouf to be full, yet fluffy. I used about 2 standard pillow’s worth of cotton and poly-fill
Step 14) sew the top and bottom holes shut with a needle and thread

And there you go! Your very own pouf!
I’m sure you’re wondering what pattern I used… well, I used part of BHG’s pouf pattern. I’m not a fan of the octagon BHG uses in their tutorial, so I threw that piece away. Also, I think the stitching on the side is a little tacky, so I skipped that step. Lastly, I did not sew a liner into my pouf because the fabric I chose is super thick. I pretty much only used pages 5-7, and read over the instructions to get a feel of the process.
I strongly recommend finding a drapery fabric or outdoor fabric, something sturdy. A thick and durable fabric will help maintain the shape of the pouf, prevent rips or tears, and have a longer life, versus a thin cotton fabric.
Let’s recap, I made two tribal poufs, a black and gold crocodile print pouf, and a West Elm pouf. Don’t you love them?
** UPDATE ** Check out my shop to see what poufs are available!
Thank you!
)
)



Love them! And the mug in the bottom pic added some nice styling if I say so myself. :)
I knew you’d like that! I love them!
how tall is it?
both the round pouf and the square measure 24″ tall
Thank you!!!!!! I’m making ’em as childrens gifts!!!
Cool!! I live near a bunch of fabric shops and I’m taking a sewing class next month. I hope mine turn out as good as yours!
Have you ever considered putting an octagonal or whatever shaped piece of 3/4″ plywood in the bottom and top of these to make them more stable as an end table?
NiceNice…!;~)))
How many yards of fabric did you use to make this? They are so cute!
That’s a great idea! The plywood would definitely make the pouf a stable end table.
The round pouf yields 1.5 yards, and the square 24″x24″x13″ pouf yields 1.25 yards. I bought 54″ upholstery sized fabric, so if you buy the shorter length fabrics at a place like JoAnne’s, I would recommend buying a yard extra for each.
What do you DO with a pouf? Do you sit on it? (Seems to be to soft for a chair.) Do you use it for a table? (Seems it would need to be considerably flatter and sturdier for a table.) Do you use it for a pillow? (Seems to be too oddly shaped to be a comfortable pillow.) Do you put your feet on it? (Seems it would need lots of stuffing firmly packed to be useful as a footstool.) They look cool, but –What am I missing?
Hi Klara! those are all great ideas! And yes, you can do them all! Sleeping on it as a pillow may hurt tho… LOL. The thing with poufs is, they need to be dense inside otherwise it’s just a big fluffy pillow, just like you said. I put about 6″-10″ of high-density upholstery foam in the center of all my poufs, which gives stability to the pouf. The foam is surrounded with a LOT of poly-fil, which give it it’s fluffy look. I think the overall idea is that it’s an alternative to a chair, seat or couch. Hope this helps!
I made one of these last year I thin using the tutorial and pattern on Design Sponge. I used heavy vinyl and really, really over-stuffed it. We use it as a footstool as its very solid.
I love easy afternoon projects like this :D
I just had a “why didn’t I think of this?” moment. The hubby & I JUST got a new sewing machine. This might just have to be our first project together on it. You see, our couch is crap so we use it as a backrest & sit on the floor, so these pouf cushions would be perfect for us.
I’m thinking of making a west elm pouf. If I may ask, how much do the materials cost on average?
It varies depending on where you buy the materials, but I would say anywhere from $40-$60. One thing – do not buy upholstery foam at Joanne’s, that is if you choose to use foam inside your pouf. Joanne’s foam is CRAZY expensive.
these are so attractive and multipurpose…
these are so attractive and multipurpose…
these are so attractive and multipurpose…
Oh wow! Much less than I expected! Thank you, and I’ll keep that in mind. :)
When I saw the title I thought of hair poofs at first, haha! But these are absolutely adorable!
i dont know if you have $1 stores in the states but in the UK we have £ shops. they are a great place to buy cheap pillows that you can use for stuffing your crafts. the best part is because they are sold on high street shops they have to be fire resistant and follow health and safety regulations so it helps add that bit of safety to your hand made goods. also most supermarkets in the UK sell really cheap bedding that is pretty useless on your bed when sold but when taken apart and put in projects like the one above is fantastic. its a great alternative to buying expensive filling from craft shops. hope that helps any new crafters out there. love the tutorial and final product, thank you
These are fantastic. Awesome job.
This is a great idea. I wonder if this will work if I use old stuffing from my kids old pillows(?)
it WILL! I used some old pillow stuffing too in addition to the poly-fil!
love these!!!!
ever since I saw these on your site, I wanted to make one, but am not getting the kind of fabrics you have used (something with bold prints),,, I have also tried the curtain stores,,,
You rock! West Elm pouf prices are a tragedy. Hats off to you for taking matters into your own hands. Awesome poufs, love the tribals. Working on one myself, but I’m not as fast as you ;)
There are tons of crochet and DPN knitting patterns to make these. I always thought they looked silly, but your fabric choices are starting to change my mind. looks like a great place to stuff things, like chothes and yarn :-P
Where did you get the pattern for the square one?
Hi Devin! I actually cut my own pattern for the square poufs out of butcher paper and an L-shaped ruler. The poufs measure 22″x22″x13″, so I cut out a square for the top and bottom, 23″x23″ (an added inch to account for a seam allowance), and a rectangle for the sides, 23″x14″. Hope this helps!
So funny! I was just looking at the West Elm catalogue thinking I’d like several poufs, then saw the price and went “Gah! How hard would they be to sew?” Thanks for the tutorial!
it is cheaper to recycle sofa cushions from a thrift store or the curb,,,as long as they are not pee stained! and cut to size. A electric knife woks well for cutting foam rubber cushioning (remove the fluffy stuff its wrapped in first). Pillows from garage sales are often $1-$2.00 each. It could get very expensive just to fill it if you go retail for the stuffing! I saw a puff that had a crocheted cover that was very cool, done with thick yarns and a huge hook. I think the stuffing was covered in cotten fabric to keep the stuffing from showing through the stitches.
wash any used stuffing on gentle and air dry completely first.
What were the measurements for your pattern on the round poo? I’d love to make one that sits 16in tall; any tips on how to create your own pattern for the round poof?
this is such a great idea! I want to make some for my girls playroom. where would you suggest i could buy the center foam from? I don’t have any old pillows and I don’t feel comfortable buying some from a garage sales. I’d just be afraid of something like bugs or pee stains. sorry i know tmi.
Poufs are amazing objects especially for kids ;) Thanks for idea
hey Jennifer! I completely agree, don’t pick up old pillows from garage sales, eew! Order your upholstery foam from The Online Fabric Store, http://www.onlinefabricstore.net/, they have the best price I’ve found anywhere. Let me know if you have more questions, good luck!
great work Brittany , truly fabulous pillows
Love these poufs, very nicely done! How much material is needed, for the round one and the square floor pillow?
Scrunched up plastic bags (like grocery bags) make great filling for the centre. Also, you can make a flat sandbag the same size and shape as the base (out of scrap/reused fabric of course), and insert it before the stuffing if you’d like the pouf to be more stable.
I would sew a zipper on one of the sides and close in the tops and bottoms with the machine. makes it easier to stuff and unstuff to wash etc. as well as sturdier in the places where they will be sat on, plopped on, jumped on…