)
)


My friends and family have asked me multiple times, why did you start a blog? What sort of projects will you blog about? Will people really read your blog?
Let me begin by saying, if you really want to know why I started this blog, it was to share projects exactly like this one. I wanted to challenge myself, share with people the ‘how-to’ and the ‘do’s and don’ts’ of what I learn through various DIY projects. As for the latter question, I can only hope my hard work, connections, and knowledge of Google and SEO marketing will bring all the readers. And, all you readers out there should do me a solid and share this post with your family and friends. Share share share! Isn’t sharing what this blogger world is all about?
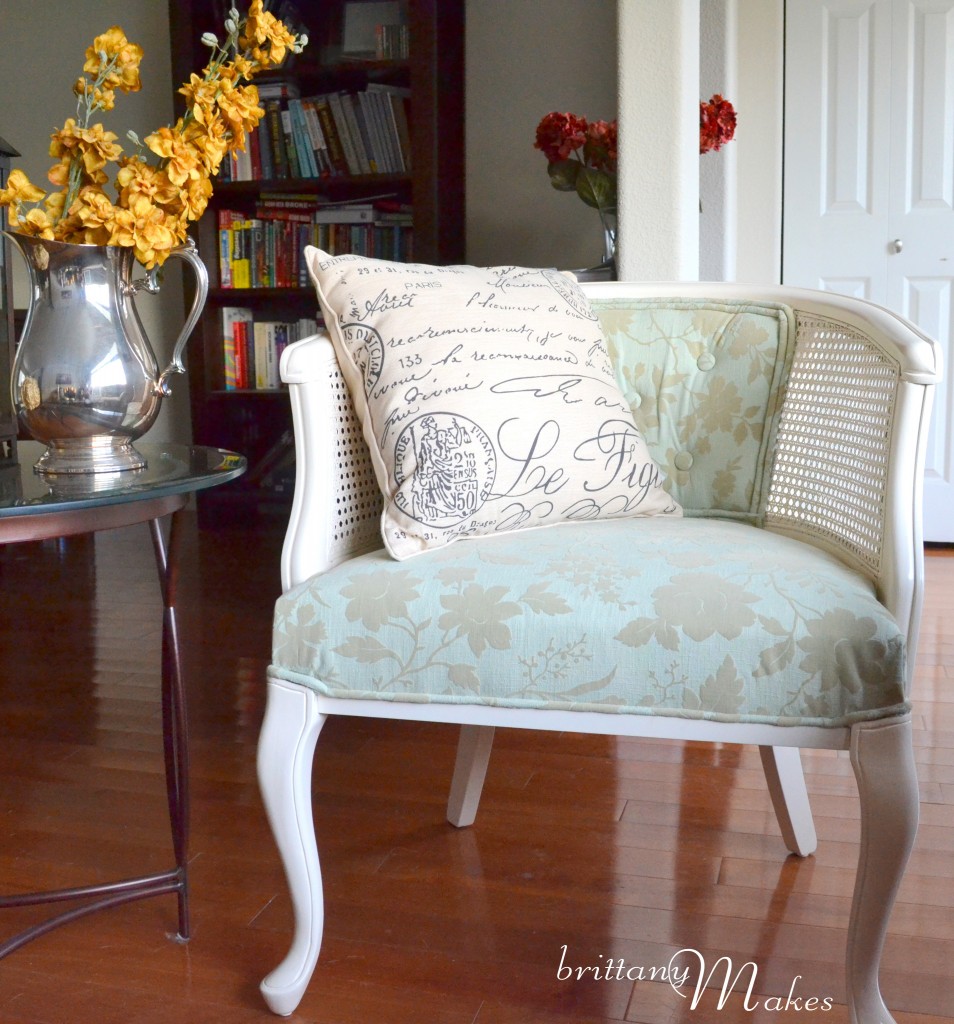
Remember that ugly orange French chair I mentioned way back when? I had shared a project sneak peek in one of my very first posts, and I’ve finally finished it!
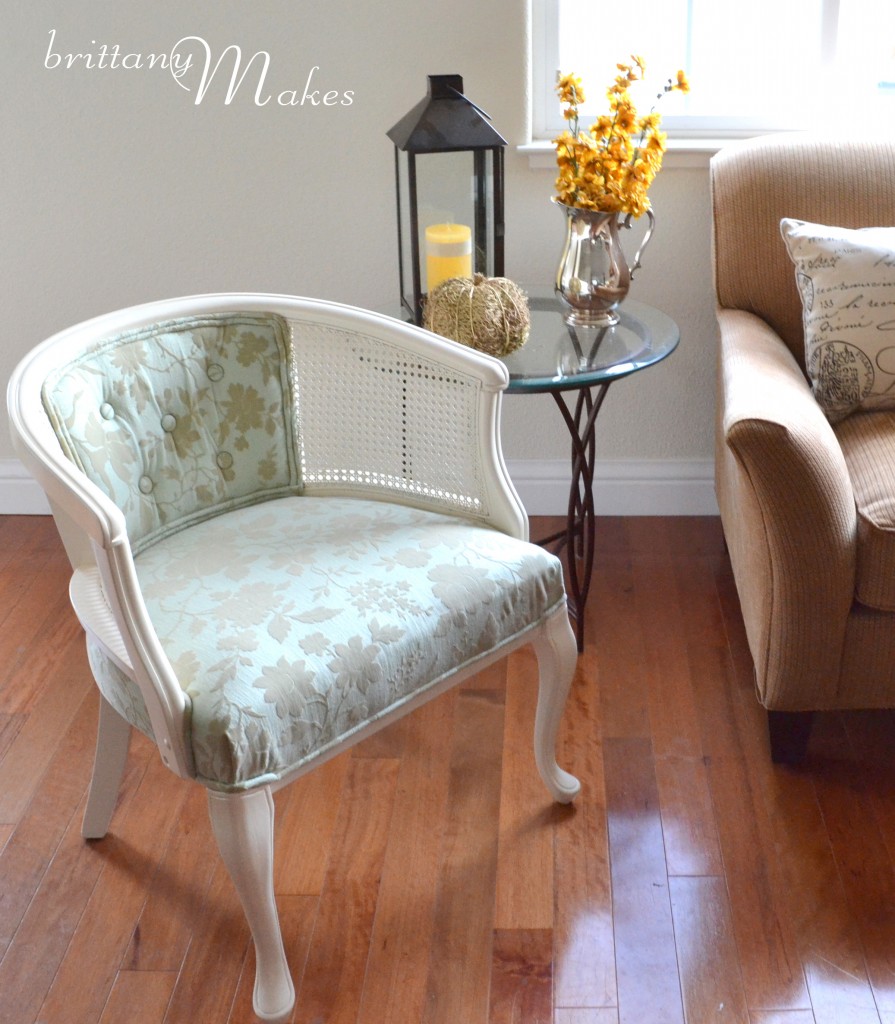
Here’s a preview the finished product:
I bet you can’t remember what this chair looked like before. This should refresh your memory:
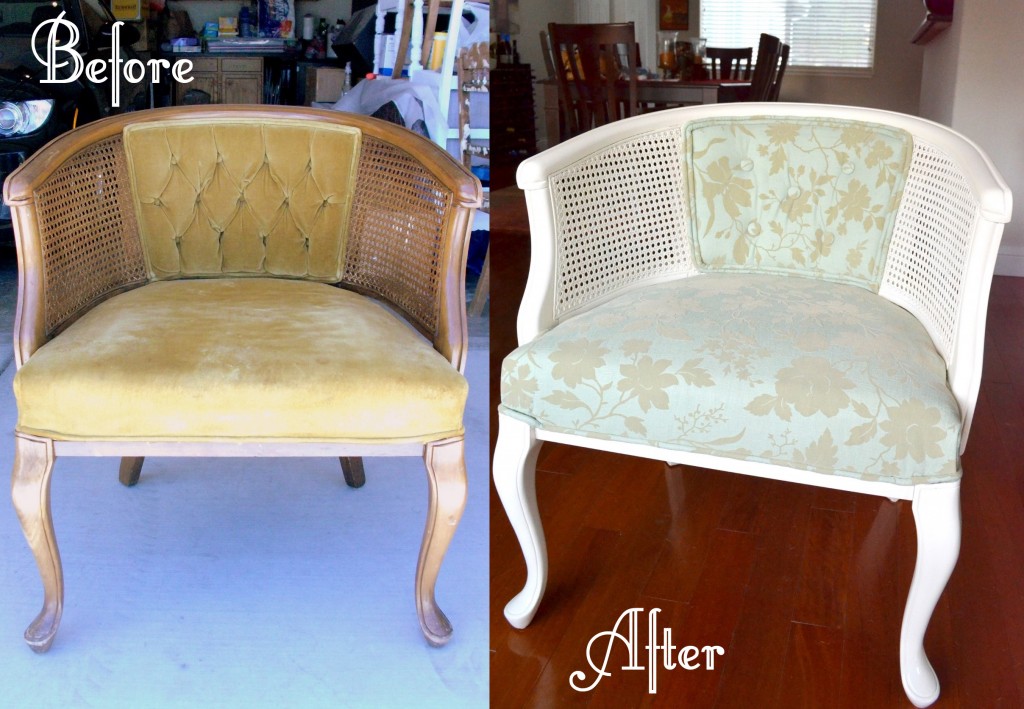
Belch! Blah! Orange and velvet? Why oh why? P.S. that diamond button pattern reminds me of a coffin, or a gangsta Cadillac.
I scored this French cane chair at my local Goodwill for $6.99. That’s right, $6.99! I bolted for this chair the second as I saw it, and carried it throughout the store with me while I continued to shop. I could sense the other customers looking at me with pity, probably thinking I have no sense of style and how ridiculous I looked attaching myself to this putrid orange velvet chair. Little did they know this chair would soon become a new beauty.
How I took my Queen Chair from Booty to Loot:
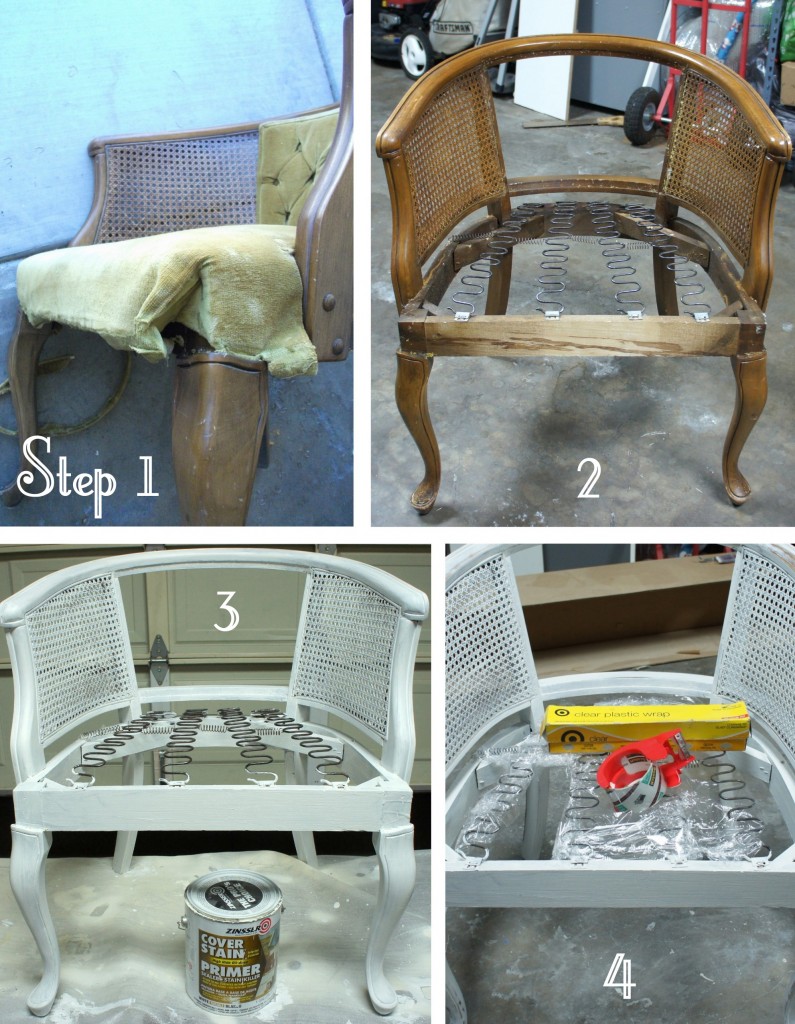
Step 1 – Remove the old upholstery & nails from the chair. Be careful not to rip the old upholstery, as you want to use it as a template for the new upholstery. I used a pair of pliers to remove all the nails.
Step 2 – Sand the chair with medium grit sanding pads to remove the varnish. Your arms will get a nice workout during this step.
Step 3 – Prime it! I wanted to get in all crevices so I opted to use Zinsser primer in the can and an angled Purdy paint brush. Sand the frame once the primer is dry, to get a smooth and even finish.
Step 4 – Get the chair ready to spray paint by covering any areas you don’t want painted, for example, the the springs. I wrapped them in plastic wrap, then tape. You could probably use tinfoil or painters tape, but I thought it was more cost effective to use plastic wrap. Spray paint the chair in the color of your choice. I can’t get enough of the classic look of creamy off-white furniture – a touch of the French countryside in a paint can, so without a doubt I grabbed Rustoleum’s Heirloom White and gave it 2 nice coats. Once completely dry, I protected the frame with a coat of Minwax’s wipe-on polyurethane.
Step 5 – Take your fabric and batting, lay the old upholstery on top of the new fabric as a template, and cut accordingly. Additionally during this step (and not pictured, sorry!) take your foam and cut it in the shape of the seat. I purchased 1″ high density foam from The Online Fabric Store, this shop literally sells the most inexpensive foam around. You can cut the foam in multiple ways, I find it easiest to cut with scissors or a serrated kitchen knife. First I cut out a square about the size of the seat, then stuffed it in place and took a serrated knife to cut around the shape of the arms, front, and back.
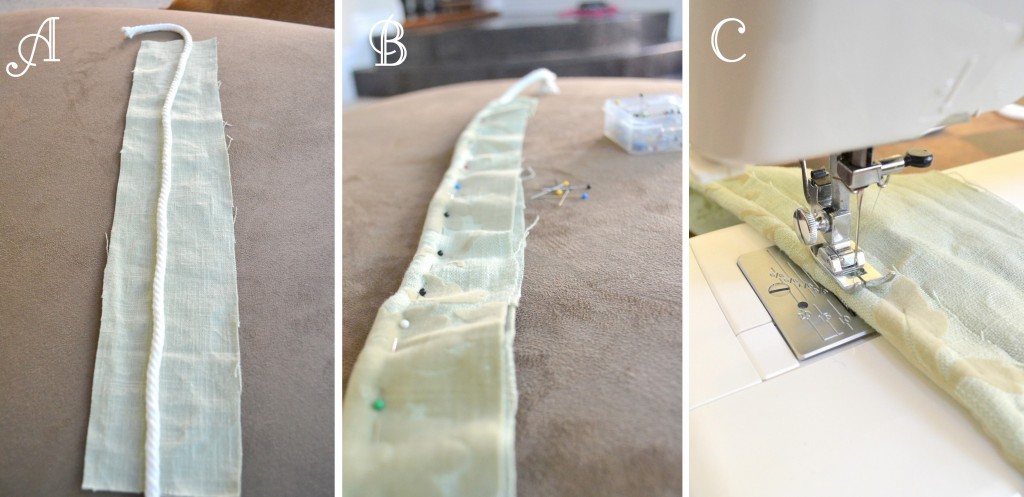
Step 6 (A thru H) – Make your own single-welt and double-welt cord
A – Measure your cord with the old upholstery as your template and cut a piece of fabric the same length. My chair needed single-welt cord around both arms, legs, and the base of the front, and double-welted cord framing the back support
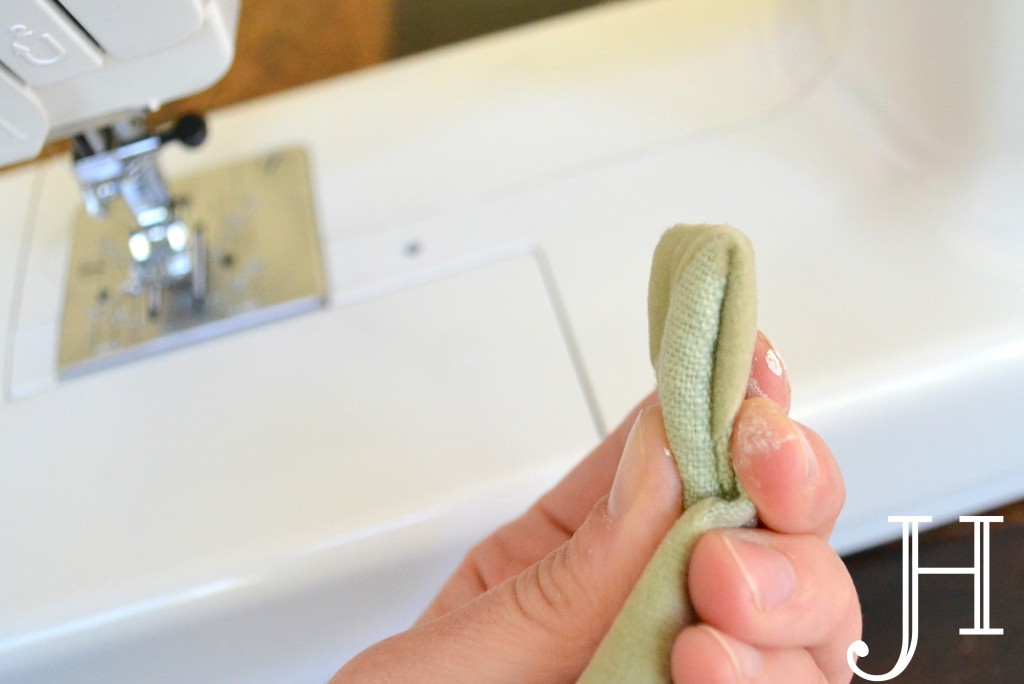
B – Wrap the fabric over the cord and pin tightly
C – Sew the fabric alongside the cord, removing the pins as you go. For single-welt cord – stop now and trim the extra fabric. For double-welt cord – proceed to step D. I lucked out, this chair only needed pieces of cord shorter than the length of my fabric. Most times you’ll have to extend the length of your fabric by sewing an additional piece along the bias. If you don’t know what I’m talking about, Google “double welt cord” or check out the tutorial from Curbly.
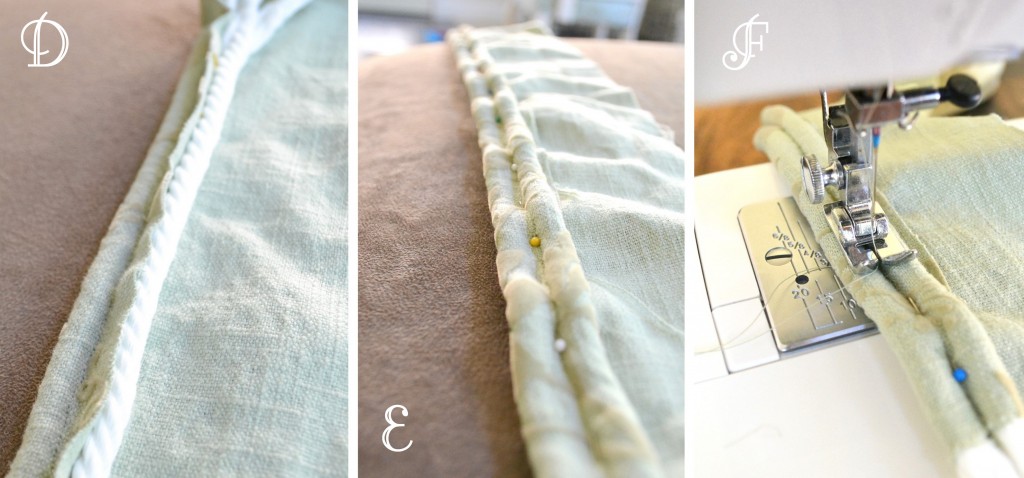
D – Wrap the excess fabric around your second piece of cord
E – Pin the fabric in place around the second piece of cord
F – Sew down the center seam, removing the pins as you go
G – Trim the excess fabric, and your double-welt cord should look like this when done. Sew one end closed, like below. This end will be tucked under the other end, so no need for a fancy closure.
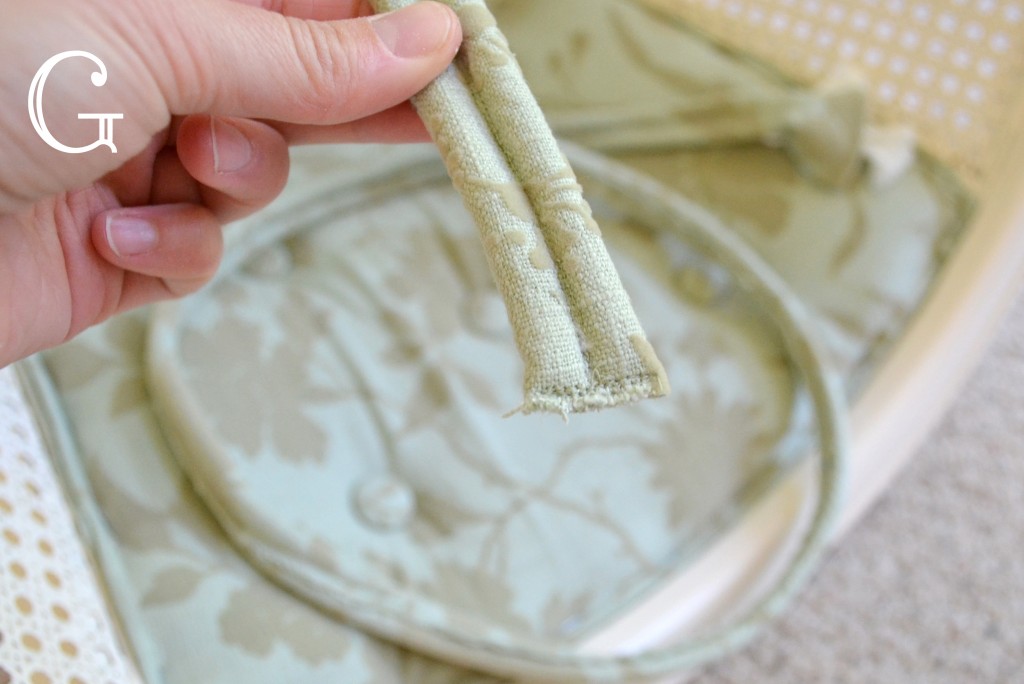
H – Make a fancy closure on the other end with your hot glue gun, place a few drops of glue on the back near the top, fold the fabric over the ends of the cord and press firmly until secure. No seams or sewing for this end.
Step 7 – According to the previous upholstery, the single-welt cord was sewn in place around the back legs. Pin the fabric in place and sew, removing the pins as you go. Do this for both back legs.

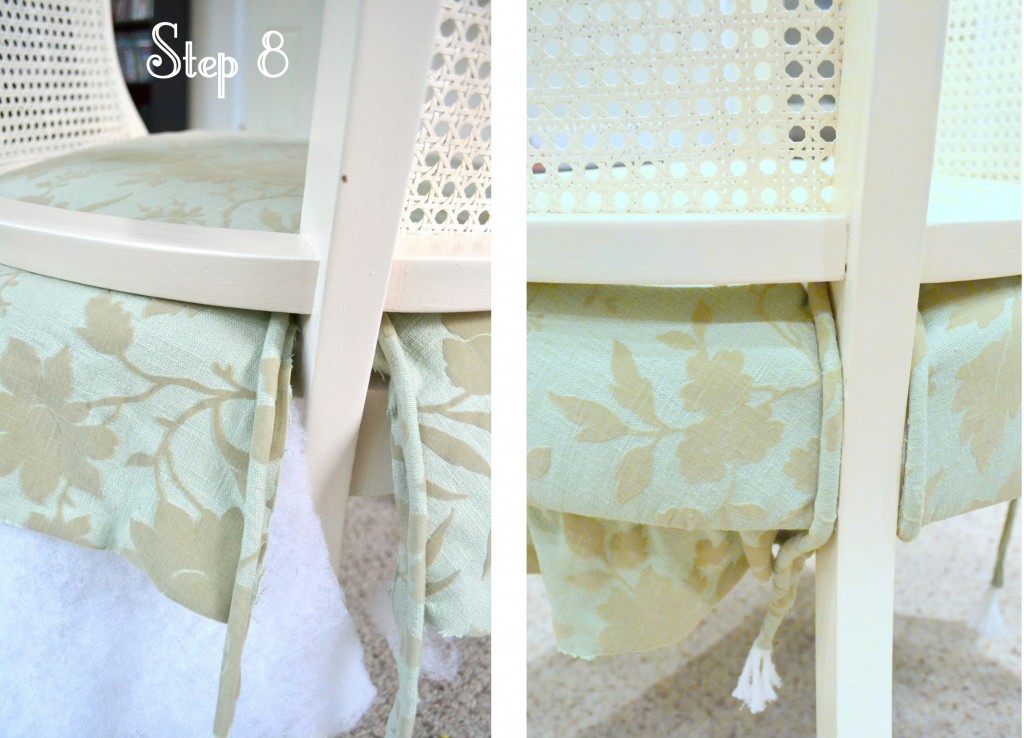
Step 8 – Lay the new upholstery in place on the chair, pull the sewn cord tightly and staple as close to the leg as you can with a staple gun.
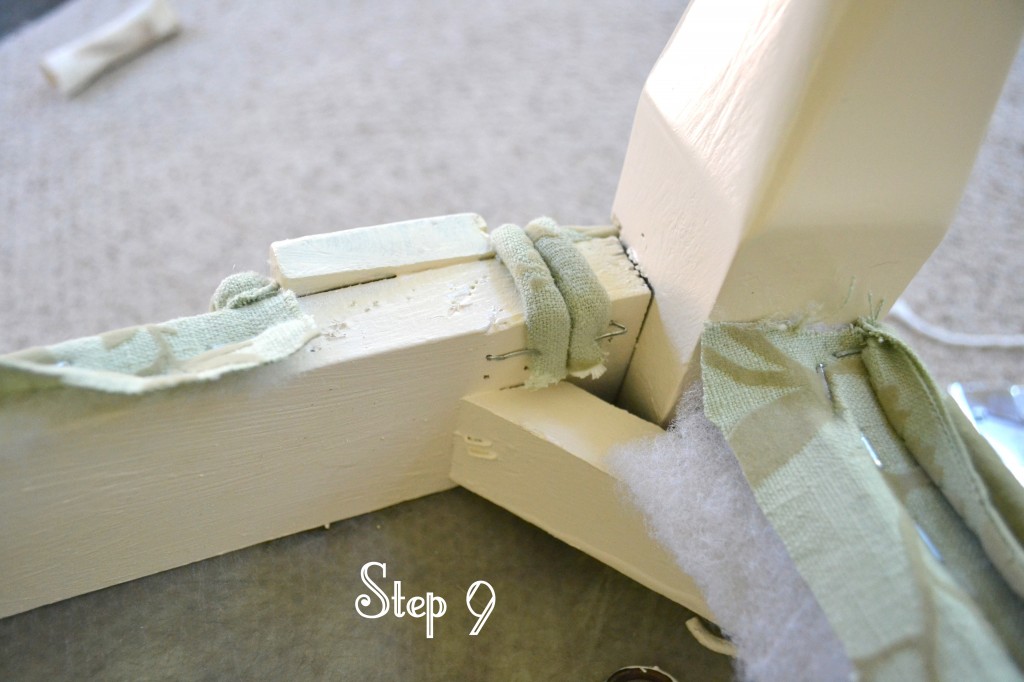
Step 9 – Begin stapling the fabric and batting to the underside of the chair. The fabric around the front legs will be stapled at the top of the legs. Trim the excess fabric. Staple the remaining 2 pieces of single-welt cord around the front legs, exactly like step 8. Flip the chair over and secure the cord underneath with staples.
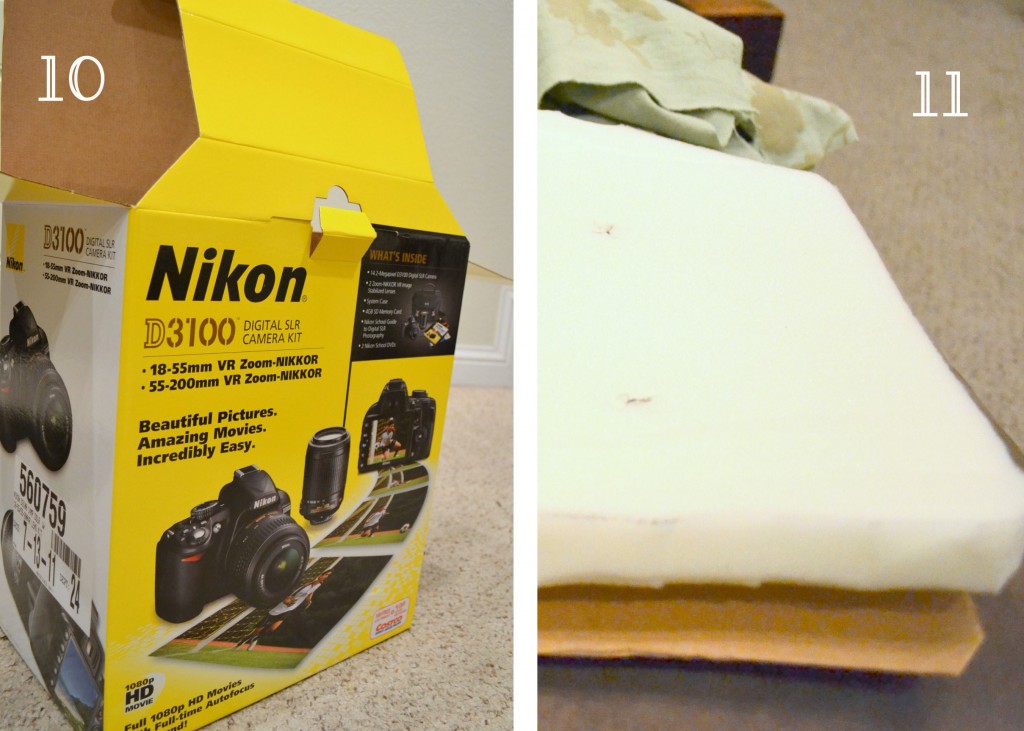
Step 10 – Find a cardboard box large enough for the back of the chair
Step 11 – Cut the cardboard, foam and fabric for the back of the chair
Using the old back as a template, trace and cut a new back out of the cardboard. You also need foam for the back support, so trace and cut a piece of foam the same shape as the cardboard. I used 1″ standard density foam for the back support, versus the 1″ high density foam I used for the seat. Standard density is more squishy and not as thick as the high density. Trace and cut fabric for both the top and bottom of the back of the chair.
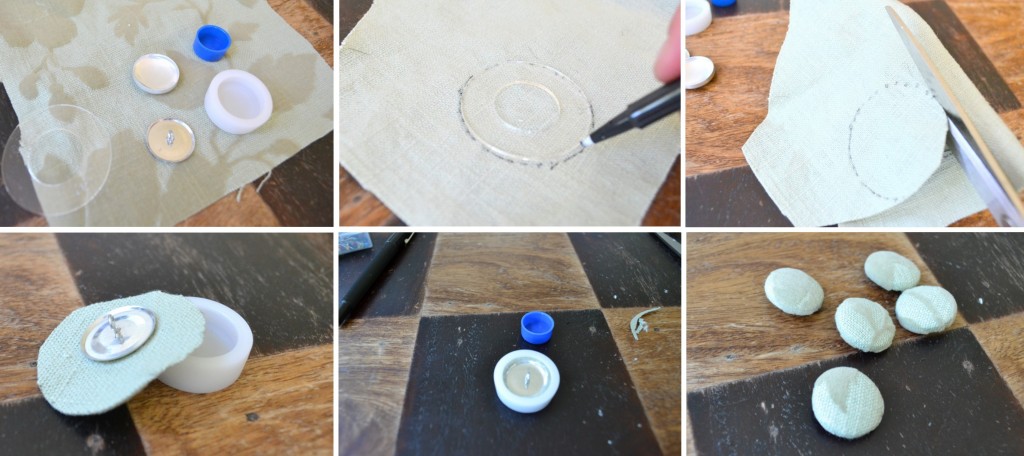
Step 12 – Make fabric-covered buttons for the back of the chair.
I bought a button kit to make fabric covered buttons, the kit included the items in the first photo. I traced and cut out a circle of fabric, and followed the directions on the kit. I wasn’t a fan of the gothic-like diamond button pattern on the old seat, so I chose a much simpler X pattern with 5 buttons.

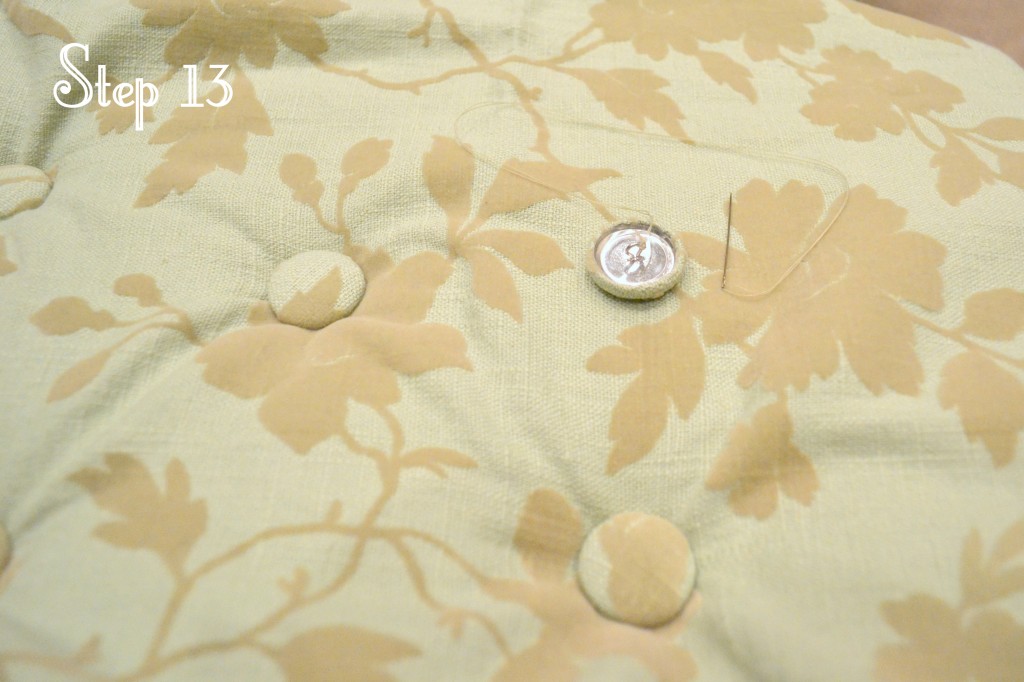
Step 13 – Sew the buttons through the top fabric and foam, and secure at the back side of the cardboard. Once all the buttons have been sewn in place, lay the entire back piece on top of the bottom piece of fabric.
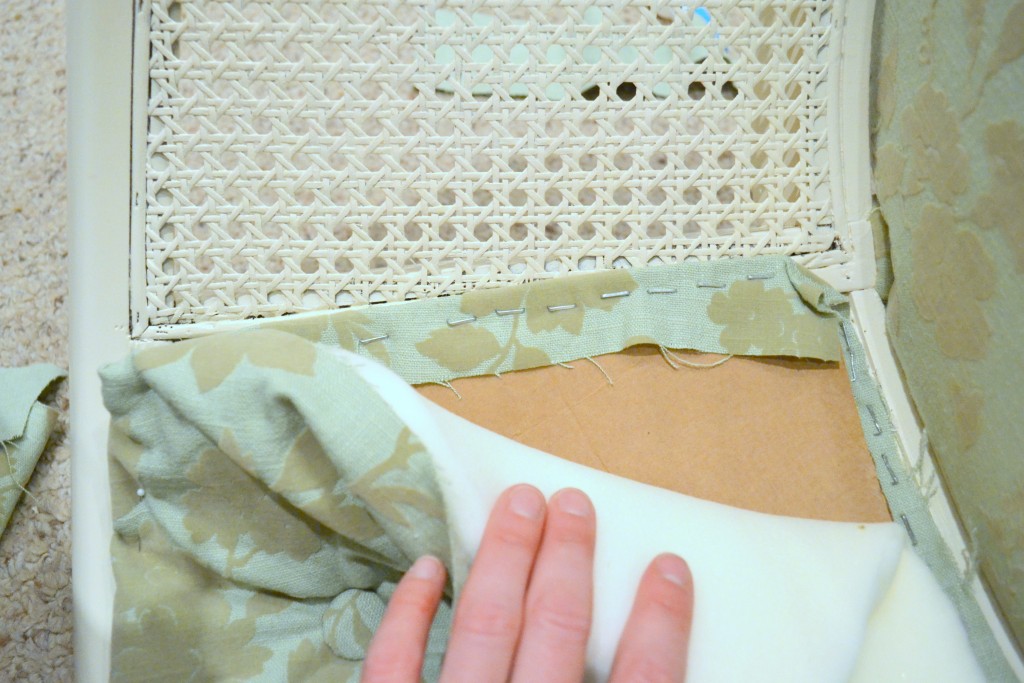
Step 14 – Staple the back to the chair
Lay the entire piece in place, fold the edges of the bottom fabric layer over the cardboard but under the foam. Pull the fabric as tight as possible, you want the exposed side of the back of the chair to be straight and smooth.
Start stapling the cardboard to the chair, around the edges and under the foam
It should look something like this:
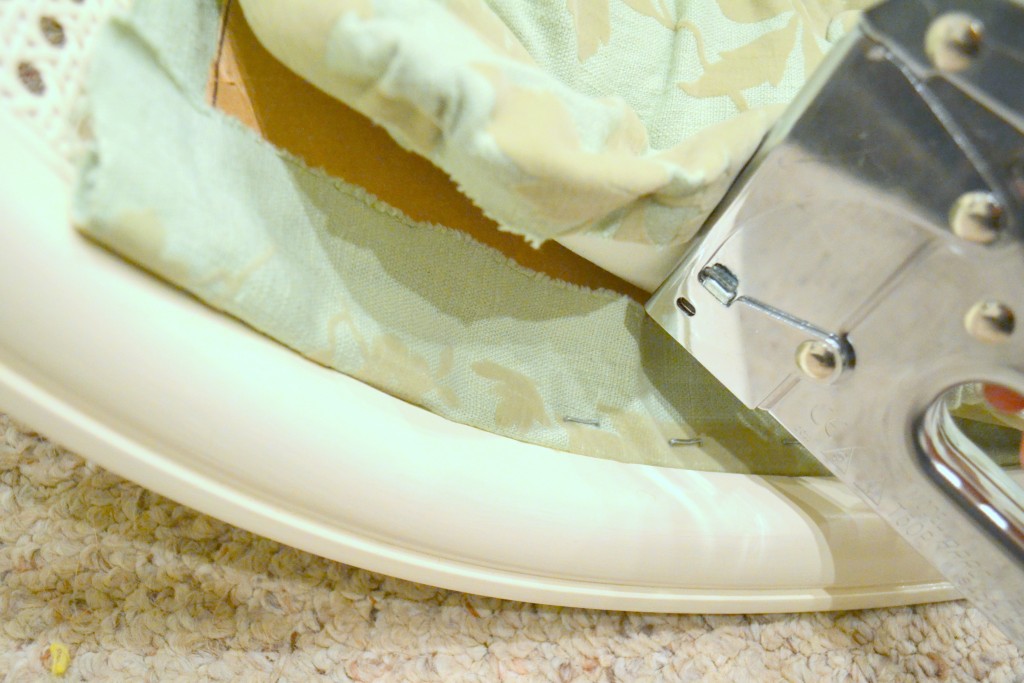
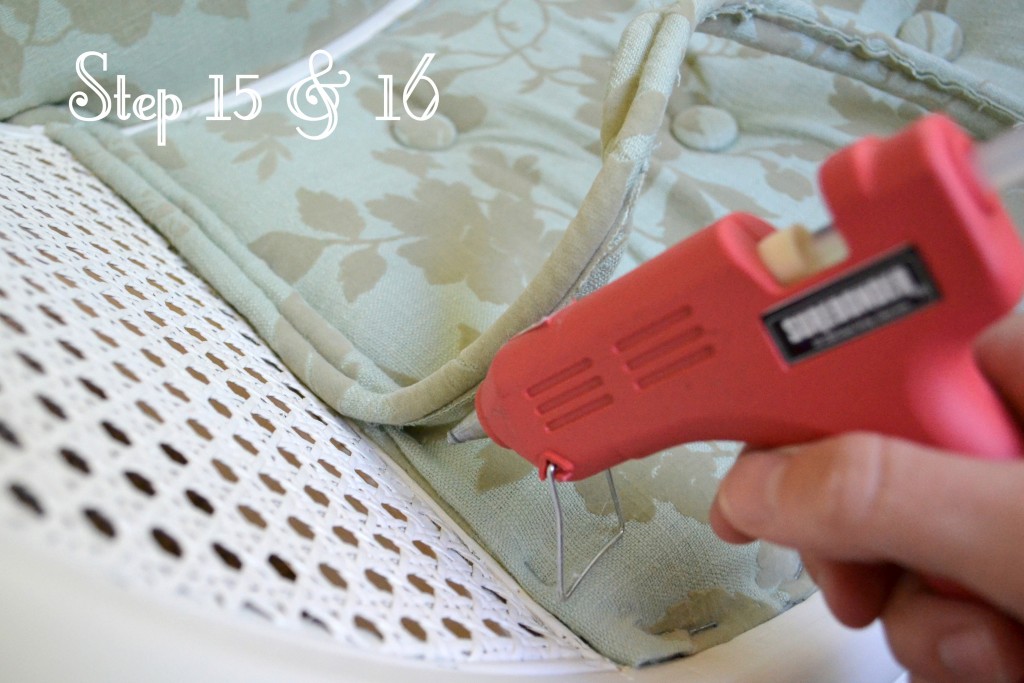
Step 15 – Staple the top side of the back to the chair.
First fold the fabric tightly over the foam, and staple around the edges. My bad – it was around 1am and I forgot to take a photo. You can see this step on the bottom left corner of the next photo.
Step 16 – With a hot flue gun, glue the double-welt cord around the back’s frame
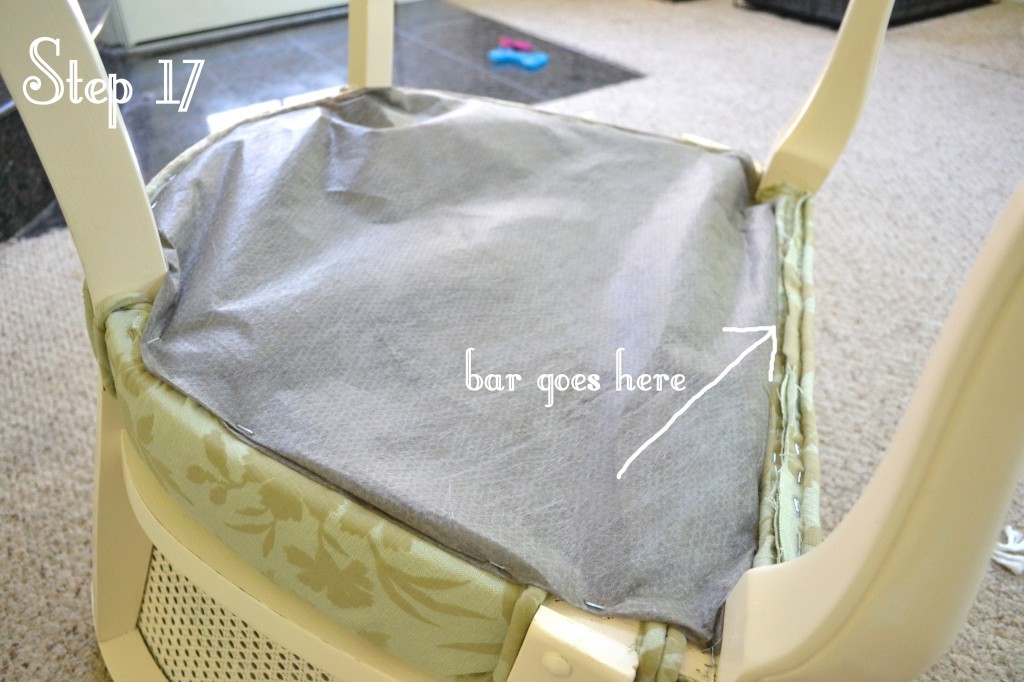
Step 17 – FINAL STEP! With the chair upside-down, staple a swatch of dust cloth on the underside of the chair.
I found a giant roll of dust cloth in my garage, but you can buy it for $.80/yard at The Online Fabric Store. I seriously love that site, I’ll will give them all my business.
You may notice I didn’t staple the dust cloth at the front of the chair. This area is covered by a wooded bar that is nailed in place with 2″ nails. I drilled a hole through the fabric and nailed the bar in place. You’ll see the bar in the final pictures.
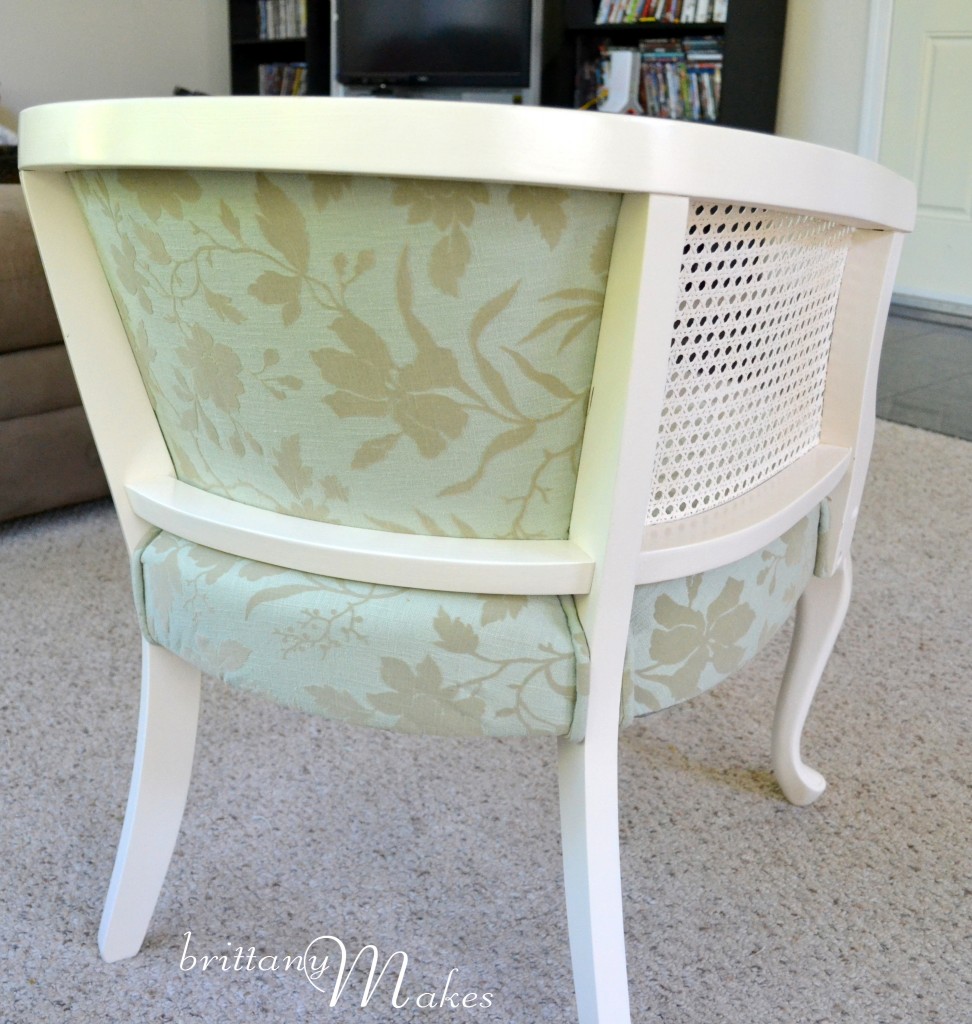
Here’s a view from the back. Can you believe only a piece of plain old cardboard sits at the back? I would have never guessed.
Since I am the queen (hehe), this will now be my everything chair. The chair I sit in when watching TV. The chair I sit in when reading, blogging, and browsing the internet. I will pin from this chair. I will gaze out the window and spy on my neighbors while sitting in this chair.
Just kidding. The chair doesn’t fit by the window ;)
I gave myself a good pat on the back once this chair was finished. This was definitely one of the most challenging projects I’ve ever completed. I would never have guessed how much planning goes into hiding all the staples, or the skill it takes to aim that staple gun just right so that the kick back doesn’t shoot the staple way off in another direction. I had to re-teach myself how to sew, I mean, I was in high school the last time I worked a sewing machine… nearly 9 years ago! I even snapped a sewing needle and I’m not even sure how it happened. All in all, I am so glad I did it, and I guarantee I’ll do it again.
Wanna know the best part? The total cost of this revamp was only $41! And I still have about a half-yard of fabric left, which I plan to use to make pillow covers. I already had the primer and sanding pads on hand, here is the breakdown of what I had to buy to bust out this revamp:
Chair $7 + 2 yards fabric $12 + button kit $6 + 2 cans spray paint $8 + cord $6 + sewing needle $2 = $41
Whoosh, long post. Thanks for reading! And don’t forget to SHARE!

Oh my gosh! This is beyond amazing. Can you come to my goodwill and find some good stuff for me???
Thanks Al! Tell me about it, I’d love to be down in socal thrifting with you!
That is beautiful!! What a wonderful project, whew!
So, I can bring over my grandmothers old chair for you to do? LOL
Great job, thanks for taking all the step-by-step to share.
Thanks April! I love that you’re still reading :)
I have been looking for a cane chair like that for over a year and still looking! Thanks so much for sharing this at MMS and also for the incredible photos. It really is a step-by-step guide and very few people go that in-depth in their posts. I am adding you to my favorites so I can refer back when I finally do find that chair!
P.S. Love that hat in your profile pic. Awesome!
Jenny
TheLavenderMagnolia
Amazing!
Omg! I love your Blog and your work! Awesome…I am trying to follow you but im not sure if i did, was so exciting reading your projects..
thank you! you’re so sweet!
Thank you for posting this! I have a chair almost EXACTLY like this…orange velvet and all! HA! I am just waiting for the perfect fabric to cover it in, but this tutorial is going to save me so much stress. xo
Champagne Lifestyle on a Beer Budget
Your step by step instructions are phenomenal! And the photos along the way are so helpful. Thanks for doing such a great job and for being an inspiration. Peace!
I was going to pay $350 to have a chair similar to this reupolstered. You’ve inspired me to try it myself! Thanks for the detailed instructions.
Yes, Linda! Do it, and save yourself the money! It’s so rewarding, a little challenging, but once it’s complete I swear you feel like you can do anything!
Oh, this is fantastic! I attained one of those old gold chairs with my marriage :) and have been wondering what in the world to do with it. It was my husband’s grandmother’s and he doesn’t want to get rid of it. Now I’m on a mission. I believe his brother has the matching one….time to negotiage to get that one as well. You rock!